In the previous posts, we learnt how to interface and use an Ultrasonic sensor using Arduino Nano and I introduced you to the Nano Robotic controller board. If you haven’t checked it out yet, I recommend you do.
- Nano Robot Controller Board
- HY-SRF05 Ultrasonic Sensor and Arduino
- Everything You Need To Know About Motor Drivers
In this article, we will see how to combine our previous knowledge and make an Obstacle Avoiding Robot Using Arduino. So without any further delay let’s get right into it.
What is an Obstacle Avoiding Robot?
As the name suggests, an obstacle-avoiding robot is an autonomous robot that uses a sensor to detect obstacles in the path and takes some actions to avoid them. Sensors like IR proximity, LIDAR, camera or ultrasonic can be used for sensing obstacles in the path of a robot.
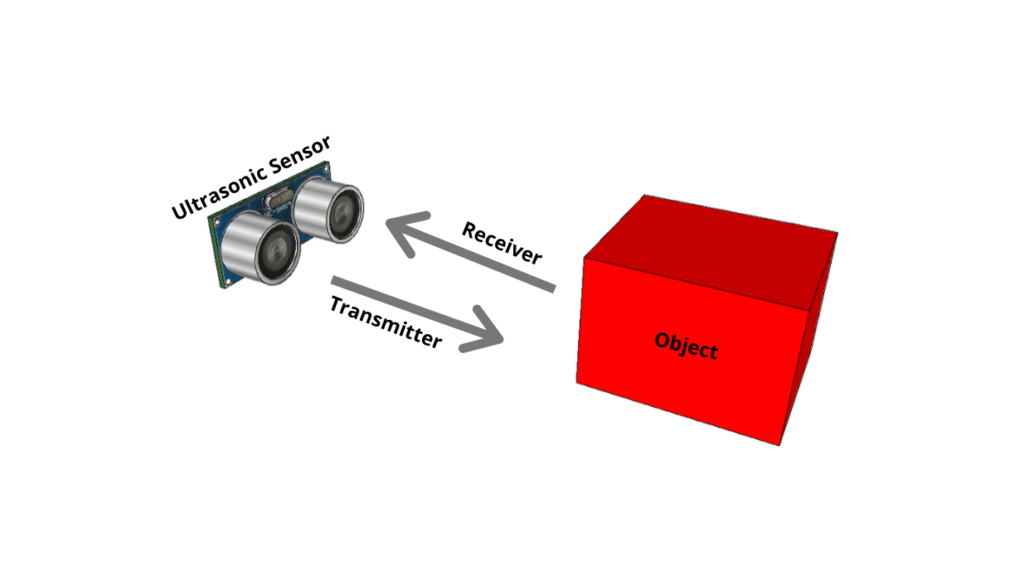
In this article, we will be using an ultrasonic sensor to detect the obstacles in the path and avoid them. I have previously explained how an ultrasonic sensor works. In short, there is a transmitter and a receiver in the sensor. The transmitter emits ultrasound waves which reflect back from a surface and the receiver senses it.

What We Need?
Here is a list of all the components that we will need to build this robot. along with Best Buy links.
Disclaimer: This blog contains Amazon Affiliate links. Buying products from those links helps us run this blog without any charges on you.
| Arduino Nano | Amazon US | Amazon IN | |
| Nano Robot Board | – | – | Aliexpress |
| HY-SRF-04 / HY-SRF05 | Amazon US | Amazon IN | |
| 9G Servo | Amazon US | Amazon IN | |
| 4 Cell 18650 Battery Holder | Amazon US | Amazon IN | |
| 2WD Robot Chassis | Amazon US | Amazon IN | |
| Female to Female Jumper Wires | Amazon US | Amazon IN |
Note: I have used Keyestudio’s KeyBot robot chassis.
Robot Assembly.
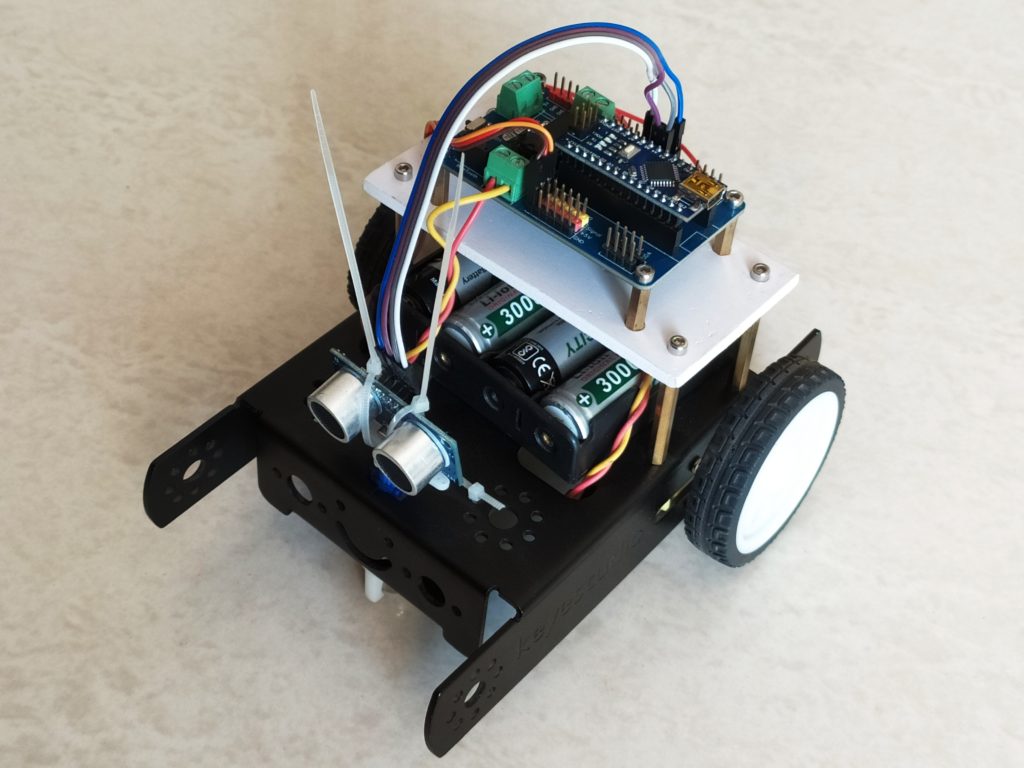
This is what the robot I built looks like:

Here I used a foam board to place the robot controller on top. Beneath that, I have placed the battery holder that holds four 3.7V Li-ion cells. I have attached a 9G servo and placed the Ultrasonic sensor on top.
I have used zip ties to hold everything in place.
Connections.
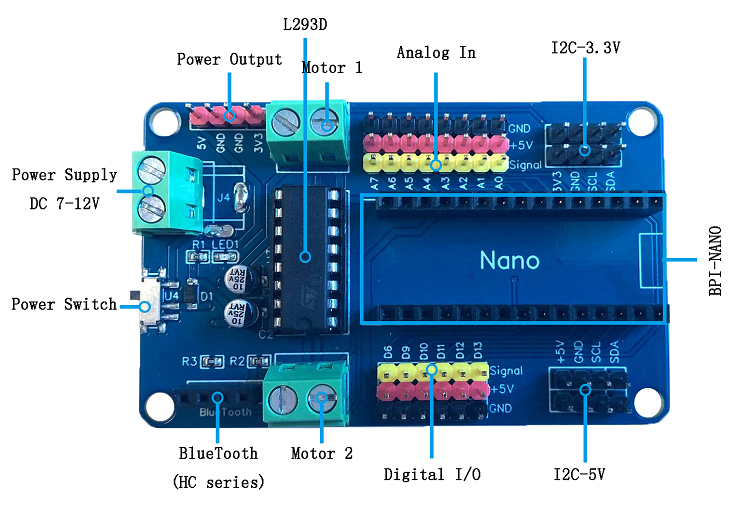
Now before making the connection, you must first understand the basics of Nano Robot Board. I recommend you to read this article which will give you a better understanding of how the board works.

The connections are as follows:
- The Trig Pin of the sensor attaches to the A0 of the Robot controller.
- The Echo Pin of the sensor attaches to A1.
- The VCC and GND pins are connected to +5V and GND respectively.
- Finally, the Servo is connected to pin D6.
Check out the following article to know more about using Motor controller and Servo.
Coding.
First download and open Arduino IDE. Next, open the library manager and type “NewPing” in the search box. Install the NewPing library by Tim Eckel.
Copy and paste the following code in Arduino IDE.
#include <Servo.h>
#include <NewPing.h>

//Motor control Pins
#define IN1 2
#define IN2 4
#define IN3 7
#define IN4 8

int16_t ENA = 3;
int16_t ENB = 5;

//Ultrasonic Sensor pins
#define trig A0
#define echo A1

#define max_distance 200
boolean Stop = false;
int16_t distance = 100;

NewPing sonar(trig, echo, max_distance);

Servo myServo;


void setup()
{
  pinMode(IN1, OUTPUT);
  pinMode(IN2, OUTPUT);
  pinMode(IN3, OUTPUT);
  pinMode(IN4, OUTPUT);
  pinMode(ENA, OUTPUT);
  pinMode(ENB, OUTPUT);

  analogWrite(ENA, 0);
  analogWrite(ENB, 0);

  myServo.attach(6);
  myServo.write(115);
  delay(2000);
  distance = readPing();
  delay(100);
  distance = readPing();
  delay(100);
  distance = readPing();
  delay(100);
  distance = readPing();
  delay(100);

}

void loop()
{
  int16_t distanceRight = 0;
  int16_t distanceLeft = 0;
  delay(50);

  if(distance <= 20)
  {
    hold();
    delay(100);
    backward();
    delay(500);
    hold();
    delay(100);
    distanceRight = checkRight();
    delay(200);
    distanceLeft = checkLeft();
    delay(200);

    if (distance >= distanceLeft)
    {
      left();
      delay(1000);
      hold();
    }
    else if(distance >= distanceRight)
    {
      right();
      delay(1000);
      hold();
    }
  }
  else
  {
    forward();
  }
    distance = readPing();
}

int checkRight()
{
  myServo.write(60);
  delay(500);
  int distance = readPing();
  delay(100);
  myServo.write(120);
  return distance;
}

int checkLeft()
{
  myServo.write(179);
  delay(500);
  int distance = readPing();
  delay(100);
  myServo.write(120);
  return distance;
  delay(100);
}

int readPing()
{
  delay(70);
  int cm = sonar.ping_cm();
  if (cm==0)
  {
    cm=250;
  }
  return cm;
}

void forward()
{
  analogWrite(ENA, 120);
  analogWrite(ENB, 120);

  digitalWrite(IN1, HIGH);
  digitalWrite(IN2, LOW);
  digitalWrite(IN3, HIGH);
  digitalWrite(IN4, LOW);
}

void backward()
{
  analogWrite(ENA, 120);
  analogWrite(ENB, 120);

  digitalWrite(IN1, LOW);
  digitalWrite(IN2, HIGH);
  digitalWrite(IN3, LOW);
  digitalWrite(IN4, HIGH);
}

void left()
{
  analogWrite(ENA, 80);
  analogWrite(ENB, 80);

  digitalWrite(IN1, LOW);
  digitalWrite(IN2, HIGH);
  digitalWrite(IN3, HIGH);
  digitalWrite(IN4, LOW);
}

void right()
{
  analogWrite(ENA, 80);
  analogWrite(ENB, 80);

  digitalWrite(IN1, HIGH);
  digitalWrite(IN2, LOW);
  digitalWrite(IN3, LOW);
  digitalWrite(IN4, HIGH);
}

void hold()
{
  analogWrite(ENA, 0);
  analogWrite(ENB, 0);

  digitalWrite(IN1, LOW);
  digitalWrite(IN2, LOW);
  digitalWrite(IN3, LOW);
  digitalWrite(IN4, LOW);
}
Connect your Arduino to the PC, select the correct Arduino board (Arduino Nano) from tools. Select the port and hit upload. After the code is uploaded, disconnect the USB and power the nano controller board using the Battery pack.
Let it loose on the floor and see how the robot avoids obstacles.
Conclusion.
The purpose of this article was to show you how to build a simple robot that can avoid obstacles. You can refer this article to implement an ultrasonic sensor into your robot to give it a sense of detecting objects in front of it.
I hope this tutorial was informative and you learnt something useful.
If you like my articles, please consider subscribing to get notified when I post an article.


2 thoughts on “Obstacle Avoiding Robot Using Arduino”
sir!!!!!!!!!! I want to learn these basics will you help me with that
If you have any queries, feel free to send us an email or content us on WhatsApp.