This is another tutorial for beginners. In this article, we will see what an Ultrasonic Sensor is and how to start using it with Arduino. This will come in handy in future projects.
If you are new to Arduino, I recommend you to check out the following articles to get a better understanding,
1. Introduction to Arduino UNO.
2. How to use Pushbuttons with Arduino.
Now that you are familiar with Arduino we can get started with this tutorial.
Supplies:
To make this project, we will need some components. Below I have listed everything we need along with Best Buy links.
Disclaimer: This blog contains Amazon Affiliate links. Buying products from those links helps us run this blog without any charges on you.
- Arduino Nano or UNO. (Amazon US / Amazon UK / Banggood)
- HY-SRF04 Ultrasonic Sensor. (Amazon US / Amazon EU / Banggood)
- Breadboard and Jumper Wires. (Amazon US / Amazon EU / Banggood)
- Arduino IDE. (Download)
How does an Ultrasonic Sensor Work?
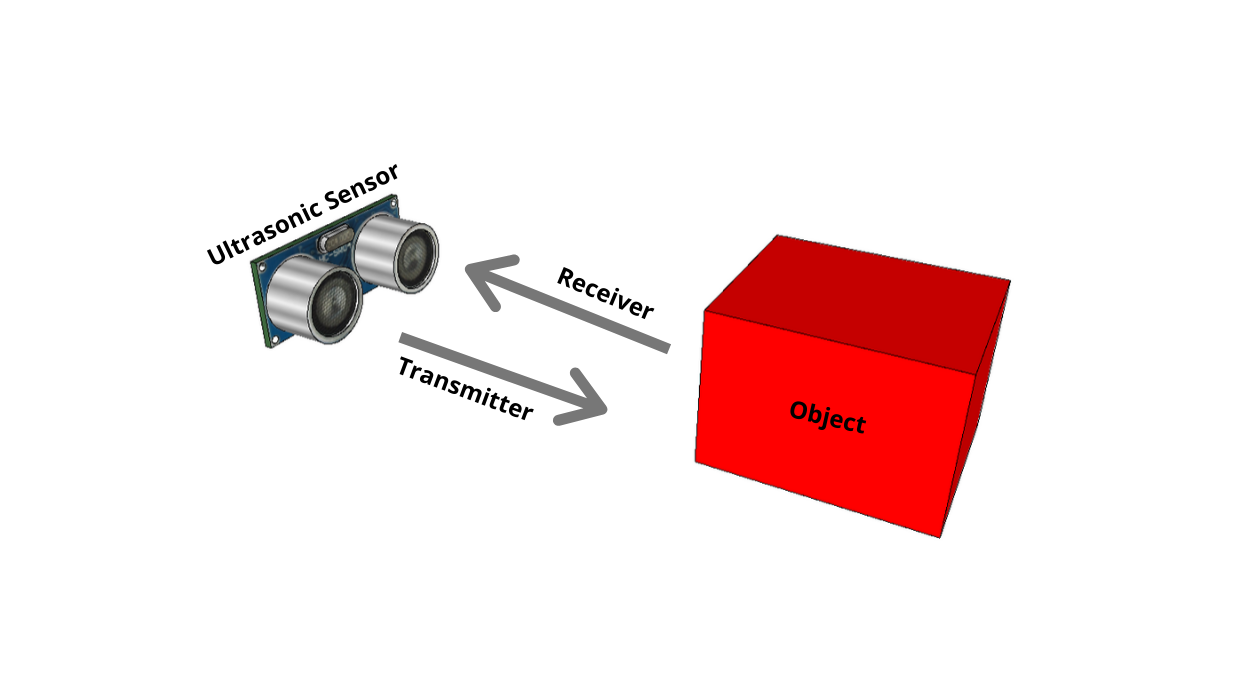
The ultrasonic sensor emits ultrasound at a frequency of 40KHz. These sound waves travel through the air until there is an obstruction. If there is an object in the path, these sound waves bounce back and are reflected towards the source i.e. the sensor. Using the speed of sound and the time it takes to reflect back, we can calculate the distance between the sensor and the object.

To find the distance between an object and the sensor. We need the following formula:
Distance = Duration * Speed of sound / 2
Duration is the time ultrasonic waves take to and reflect from the object.
The speed of sound is about 343m/s or 0.034cm/s.
Making Connection.

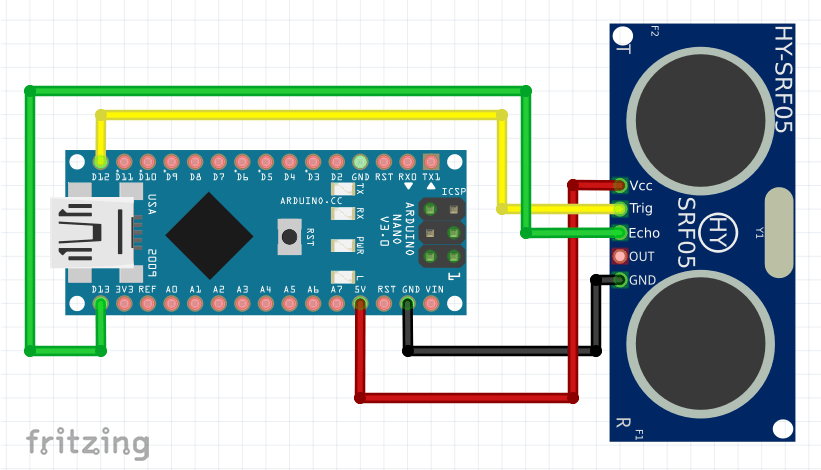
The connections are:
- VCC = 5V
- Trig = D12
- Echo = D13
- GND = GND
Connections are pretty simple and if you are using Arduino UNO, connect the Trigger and Echo pins to 12 and 13 pins of Arduino respectively.
Now let’s write a simple code to calculate the distance.
Coding.
Now let’s see how to write a code to measure the distance between an object and the sensor.
First, we declare the trigger and echo pins as 13 and 12 respectively.
We also need two variables to store the duration and distance.
const unsigned int TRIG_PIN=13;
const unsigned int ECHO_PIN=12;
long duration;
int distance;
Next, we write the setup function, this function will be called first.
Here we declare the pin mode. First, set the serial communication at a baud rate of 9600. This will allow us to display data on the Serial Monitor.
Next set the TRIG_PIN as OUTPUT and ECHO_PIN as INPUT.
void setup()
{
  Serial.begin(9600);
  pinMode(TRIG_PIN, OUTPUT);
  pinMode(ECHO_PIN, INPUT);
}
Now we write the final function void loop(). The code in this function will run in an endless loop until the Arduino is reset.
First, we will set the trig pin low for 2 microseconds and then set it high for 10 microseconds. This will send out a burst of ultrasonic pulse.
 digitalWrite(TRIG_PIN, LOW);
 delayMicroseconds(2);
 digitalWrite(TRIG_PIN, HIGH);
 delayMicroseconds(10);
 digitalWrite(TRIG_PIN, LOW);
Next, we must read the time it takes for the pulse to reflect from an object to the receiver. We will store this in the duration variable.
duration = pulseIn(ECHO_PIN, HIGH);
Now that we have duration, we can calculate the distance using the formula mentioned previously.
distance= duration*0.034/2;
Finally, we need an if-else statement where we will check if there are any reflected pulses.
if(duration==0)
  {
     Serial.println("No pulse from sensor");
  }
  else
  {
     Serial.print("Distance :");
     Serial.print(distance);
     Serial.println(" cm");
  }
  delay(1000);
Here is the complete code:
const unsigned int TRIG_PIN=13;
const unsigned int ECHO_PIN=12;
long duration;
int distance;

void setup()
{
  Serial.begin(9600);
  pinMode(TRIG_PIN, OUTPUT);
  pinMode(ECHO_PIN, INPUT);
}

void loop()
{
  digitalWrite(TRIG_PIN, LOW);
  delayMicroseconds(2);
  digitalWrite(TRIG_PIN, HIGH);
  delayMicroseconds(10);
  digitalWrite(TRIG_PIN, LOW);

  duration = pulseIn(ECHO_PIN, HIGH);
  distance= duration*0.034/2;

  if(duration==0)
  {
     Serial.println("No pulse from sensor");
  }
  else
  {
     Serial.print("Distance :");
     Serial.print(distance);
     Serial.println(" cm");
  }
  delay(1000);
}
Final Note.
Now that you know what an ultrasonic sensor is and how to use it. You can start playing around with it and make cool projects. In future we will use it to build some amazing projects like Radar or Obstacle avoiding robot.
Hope you like this tutorial and learned something new.


2 thoughts on “HY-SRF05 Ultrasonic Sensor and Arduino”
Many thanks.